SURFBOARD DESIGN


OUTLINE

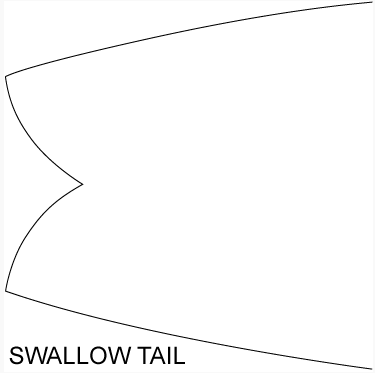
The outline, or plan shape is the curve that forms the outer edge of the board when observing from the top or bottom of the board.  Measurements are taken one foot from the nose, at the widest point in the center section, and one foot from the tail. These dimensions give only a general idea of the board’s shape because varying intensities on the outline curve cannot be told with just three measurements.

Although much of the board’s riding characteristics can be attributed to the outline, one must realize that it is simply one element in a much larger assemblage of contents that makes up the final shape.  But each of the three measurements does provide its own defining contribution to the board’s performance, and with that contribution usually comes some sacrifice to another aspect of the board’s performance.  For example, as the nose becomes wider, it becomes more stable to stand there.  The down side of this is that widening the nose adds more volume of material or swing weight in front of you while turning, so the ease of turning diminishes.  When the surfboard drops into a wave, a wider the tail will captures more water, thus causing better lift.  As the tail design gets wider it becomes more and more stable but this will make it difficult to tip on an edge to turn.  Boards that are wider in the mid section are more stable but are more difficult to turn because they don’t tip up on a rail as easily as their narrower counterpart.  The three measurements work in concert, and as one grows or reduces, it affects the others.  If the nose and tail remain the same and the center width increases, the board gains stability.  As the board gains stability, it also gets more difficult to tip on a rail to turn. Conversely, if the nose and tail increase in width and the center remains the same, the rails become more parallel, complimenting the nose ride but decreasing the maneuverability because there is little curve to cause drag in the turn.  Increase the nose width and leave the other dimensions alone and it moves the wide point forward, reducing the center curve, making it more difficult to turn.  Increase the tail dimension, and decrease the nose width, and it will make for great turns, but the board will be slow and a poor nose rider.

Boards with a three-fin set up typically have a narrower tail than single fin boards..  As the fins start getting too far apart with a wider tail, the rotational effect needed to turn is restricted.

 
OUTLINE

OUTLINE


ROCKER

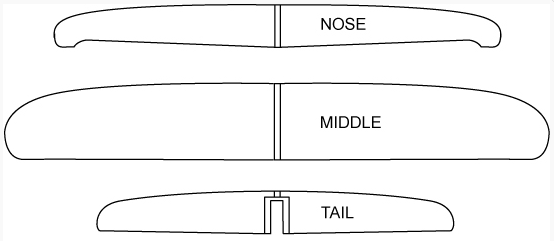
Rocker is the term for the curvature of the board from nose to tail, looking at the board’s edge.  This is measured on the bottom of the board.  A long straight edge is placed on it, with the straight edge’s center matching the center of the board.  The distance from the board to the straight edge a given point is considered a rocker measurement. Key numbers are zero (or the end of the board), 6”, 12”, 18”, 24”, and the board’s mid point.  A basic rule of surfboard design is that as the board’s nose rocker decreases, the nose width increases.

There are three primary areas of rocker: nose, middle and tail.  Using a long board as an example, increasing the nose rocker will cause less water to splash in the face while paddling, and decrease the chance of catching the nose while dropping into a wave or while turning.  However, increased nose rocker combined with increased nose width when paddling into a wave, will push water, making dropping into a wave more difficult.  Too much nose rocker can also cause the tail to release prematurely when nose riding.

Increased rocker in the middle of the board will lower the board’s drive, and slow the paddling. Too flat of a rocker curve in the middle will make the board stiff.

A key area of rocker is the area between 12 and 18 inches from the tail. There should be a bend in this area with a flatter curve forward of this bend. This joining of tail curve and flatter area of the mid section are one of the key elements of surfboard design and must be in concert with outline and rail shapes. It takes years of knowledge to know how much and where to put this bend.

Increased tail rocker will ease turning and increase tip time.  But it will slow paddling, down line speed and decrease drive out of the turn.  Decrease the tail rocker and the board becomes stiffer in maneuverability, but the forward drive increases.

Rocker design is a very complex series of give and takes.   I have been designing surfboards since 1959 developing a good blend of rocker curves – and they work. Now I take this knowledge and incorporate it into Computer Aided Design (CAD).  This has taken Harbour Surfboards to a new level of precision that was never before attainable. There is nothing more important as the relationship of the previous curve of the rocker to the curve next to it


FOIL

This is the thickness relationship deck to bottom.  The foil on a surfboard is a delicate balance that is lost on any but the most consummate designer.  At Harbour Surfboards, the foil is the first building block of the entire design.  Too thick in the nose and it has swing weight problems in turning.  A nose that is too thin will set too deep and track.  Too thick in the tail and it is too corky to turn and too thin will paddle poorly.


CONCAVE & NOSE CHANNELS

These are nose riding embellishments to ap lift when riding on the nose. The concave is a traditional technique in shaping to enhance nose riding. This style was popularized during the mid-sixties at the peek of the nose riding craze. There are many ways to carve it into the nose area. Leaving a smooth exit line will make trimming much better. Enhancing the edges and making the concave deeper will enhance the lift, making for incredible nose rides but not much speed in trimming. The other style is nose channels created by Rich Harbour.

Originally they were a pair of nose channels on each rail that followed the rail outline. These proved very difficult to fiberglass so the inside one was removed from each side with no noticeable change in performance. For several years they were made 2″ from the rail. A board for a team member was being shaped when the sandpaper block hooked into a freshly carved channel. It had to be moved closer to the rail resulting in what the team member called the best nose ride ever. They are all now 1 5/8″ from the rail.

The differences in feel of the two styles are slight but noticeable. The concave is a more of a stalling style, making it smooth and stable ride. The nose channels don’t slow the board down when in the trim spot at about 1/3 back from the tip. Many better surfers claim to be able to climb and drop with them. We have applied each style to an appropriate shape in our line of boards. Enjoy!

 
DOWNTURN RAILS

DOWNTURN RAILS

 
50/50 RAILS

50/50 RAILS

RAILS

There are two basic styles of rails. One is the down turned rail that was popularized in the nineteen seventies, and the traditional 50/50 rail that was carried over from the wood board days. Shaped just like their namesake, 50/50 rails are sometimes referred to as egg rails. The apex of most 50/50 rails is slightly below center. The surfboard’s bottom is somewhat flat through the center twelve inches, and then it blends into the rail. This style rail is smooth riding and many claim it nose rides better. The 50/50 rail lets some water slip by, so you must increase the fin area or move the fin aft for more leverage. 50/50 rails feel somewhat smoother – they have that glide feel. They find a slightly lower line on the wave, and seem to nose ride with a little more control.

Down turned rails are about 75% down in the middle of the outline, with a soft roll, quickly blending into a flat bottom. They usually change to full down turned rails with a hard edge about 20 to 24 inches from the tail. This is the area that the outline shape makes the transition into the tail curve. The hard edge in the tail area of the down rail board will grip the water allowing for fin designs with less total area. A fin should be of less volume on a board with hard tail rails than on a board with 50/50 rails. This is because the edge on a board with down tail rails is, along with the fin, gripping the wave. Boards with a down tail rail and a soft low mid rail, will initiate cut-backs better due to the fact that water isn’t being trapped by wrapping the rail. They give more tail lift, and this makes them seem to accelerate faster which is sometimes referred to as drive. This rail design is not well suited for heavier boards.

Rails will set into the wave to a depth relative to the rider’s weight. Heavier surfers need more volume so it can either be put into thickness, which increases the rail size, or length or width, which will allow for thinner rails.


STRINGERS

Stringer is the common name in surfboard construction for the piece or pieces of wood that divide the foam blank. The stringer is glued in after blank is removed from the mold.  Stringers both give the blank rigidity for shaping, and the finished product.  They also provide the shaper a sight line to use while shaping.  Colored glue can be used to decorate the lamination.

BASS WOOD:  (Tilia americana) is a very clear grained hardwood that is easily shaped.  It is light, with a specific gravity of just less than 0.4.  To compare, Balsa (Ochroma pyramidalis which is also a hardwood) is 0.15.  Lignum vitae, the heaviest wood, has a specific gravity of over 1.2. (This stuff doesn’t even float!)

The words hardwood and softwood have nothing to do with the wood’s hardness. All trees are members of the plant kingdom that are spermatophytes or seed plants. This kingdom is further divided into two broad groups (separated by how the seeds are born). Gymnosperms are naked seeds and comprise all trees that produce softwood lumber. Angiosperms are covered seeds (like walnut, pecan etc.) that make up the hardwood group.

CEDAR:  Due to the difficulty in finding redwood that is free of any white color and knot free, I have chosen to use cedar (Thuja plicata) a wood that visibly resembles redwood.  Like redwood, cedar is almost 25% weaker than basswood.  I recommend cedar only in three stringer boards or T-bands.  Most people refer to T-bands as two alternate colored woods glued together in a pattern (e.g. cedar-balsa-cedar).  T-Bands are known within the surfboard industry as more than on piece of wood or foam glued with another, which could be the same type of wood or foam.  Our foam supplier can put together just about any combination of stringers that you want.  Be advised that these requests can sometimes add weeks to the time of production.

When using basswood, we use 1/4″ width for the thicker boards and 3/8″ for the thinner, high performance models.  Shorter boards have 3/16” bass stringers.

BBQ CEDAR: This is a name that US Blanks has attached to a very dark colored wood that they are using in place of cedar or redwood.  It most likely is color-infused poplar that has a specific gravity of about .4.


TAIL SHAPES

DIAMOND TAIL: This shape moves the release point forward, essentially shortening the outline and rail rocker. This is particularly advantageous when a contest limits you to a 9-0 minimum and your 9-0 diamond has only 8-10 of rail line. An even tighter radius turn is the result, but with a little less drive than the squash or square.

SQUARE TAIL: Provides the cleanest water release plus a corner that provides the best bite. The best drive (forward thrust from pushing down on the rail) is obtained with this shape.


PINTAIL: Has a continuous curve coming to a point at the tip. This shape has the easiest connection from front to back side turn but has the least drive.

SWALLOW TAIL: These tails when the tips are in the normal 4”-5” range will produce a very similar feel to the square tail. When they are very far apart, such as a FISH style (shown here), the outline becomes very straight and the drive is accented.


SQUASH TAIL: Is nothing more than a square tail with the corners rounded, thus softening the bite and drive of the square, but also making the turn a little smoother  and tighter. 


SURFBOARD CONSTRUCTION


THE MAKING OF A BLANK

The surfboard begins at the blank factory where two chemicals are mixed together to form a rigid polyurethane foam which is poured into a concrete mold. It dries and when removed from the mold it is known as a surfboard blank. Available are numerous blanks of various lengths and proportions to fill the many needs of the surfboard industry. One or more strips of wood, known as stringers are inserted to make the blank rigid enough to shape them to size and strong enough to resist breaking. These stringers are pre cut to a lengthwise curve known as the rocker. We at Harbour have created private rocker templates available to only us. With a pencil, a skilled craftsman at transfers the Harbour rocker template onto a piece of wood and cuts it out to that line and it becomes the stringer. During the gluing, the blank is bent to the curve of that stringer, and when the glue is dry the blank now has the rocker that the stringer has.


SHAPING THE BLANK

COMPUTER SHAPE

  • Always searching for a new design concept, periodically new surfboard shapes are created by Rich on his computer using special surfboard designing software.

  • A blank is then attached to a table that has special vacuum cups to hold it in place. Using a grinding bit made of thousands of tiny carbide particles, a CNC machine makes an exact copy of Rich’s computer creation. The finish computer shape is rough and has no rail shape on the bottom rail edge, leaving some ability to fine tune each board. However it does have the exact foil, outline, deck crown, channels, concave, tail “V” and any other design features that the original had.

  • Hand finishing one of these computer shapes takes a great deal of skill and about 45 minutes time.

  • The advantage of a computer prepared board is that it is next to impossible to hand shape identical surfboards. This technique is excellent for reproducing a model, keeping the consistency at a maximum.

  • We now have the ability of making specific changes to any existing shape or creating a shape from existing foils on our computer database. There is an additional charge for this option.

HAND SHAPE

  • Blanks are ordered with a specific rocker glued into the deck of the blank. The shaper removes the skin of the blank from the deck. Any irregularities that may have developed in gluing are addressed at this time.

  • The blank is then turned over and proportioned, creating the blank’s foil, and then it is brought to thickness.

  • The appropriate outline is drawn and cut out.

  • The rails are roughed in.

  • The board is finish sanded.


GLASSING 

COLORING BY FOAM SPRAY

  • This technique must be applied now

  • Areas of the finish shaped blank are covered with tape and masking paper to create a design. Water based acrylic paint is sprayed onto the exposed areas of the blank.

THE LAMINATION

  • Two ways to hand laminate (called a lamination) are:

    • Free Lap

      • Fiberglass cloth is pulled over the entire length and width of the finished blank’s bottom. The cloth is trimmed by scissoring about 1 1/2” below the rail’s center line all around the blank. The Harbour logos that have been silk screened onto rice paper are placed beneath the glass. Polyester laminating resin is catalyzed and poured onto the glass and the resin is spread evenly with a rubber squeegee. The fiberglass is wrapped around the rail, with the squeegee pressing it tightly to the foam blank.

      • When dry, the edge where the glass ends is smoothed and the entire lamination process is repeated on the deck.

    • Cut Lap

      • The deck is taped off about 1 ½” from the rail. Then masking paper is applied to the inside edge of the tape to form a wide barrier.

      • Fiberglass cloth is pulled over the entire length and width of the finished blank’s bottom. The cloth is trimmed by scissoring about 2” below the rail’s center line all around the blank. Polyester resin is catalyzed and poured onto the glass. Pigments may be added at this stage to create transparent or opaque colored boards (this technique must be applied now). The resin is now spread evenly and the glass is wrapped around the rail and past the masking tape with a solid rubber squeegee.

      • When the resin is in its final stages of hardening, the board is turned deck up and a razor blade is used to cut the excess glass that goes past the masking tape.

      • The Harbour logos that have been silk screened onto rice paper are put onto the surface glass beneath an additional layer of glass that extends slightly beyond the logo.

THE HOT COAT

  • The rough texture of the finished lamination needs to have a smooth finish to sand. This is known as the hot coat, getting its name from the fact that this coat is heavily catalyzed to get a quick cure and this high catalyst content typically warms the resin. Laminating resin has catalyst and surfacing agent added and it is spread over the deck of the board with a brush.

  • Repeat the hot coat on the bottom.

FIN BOX

  • A jig is attached and a hole is routed into the bottom near the tail to accept the fin box.

  • Glass cloth is cut to wrap around the bottom and sides of the fin box.

  • Catalyzed resin is poured into the routed hole and the glass and fin box are plunged into the hole.

SANDING

  • The entire board is power sanded using sandpaper attached to a soft rubber sanding pad.

  • The rails are hand sanded.

  • The entire top and bottom are block sanded.

  • The entire board is again sanded using a fine paper.

GLOSSING

  • The center of the rail is taped with the under side of the tape hanging free. A special blend of resin called glossing resin is brushed on the deck and the excess resin runs off of the tape on the rail onto the floor.

  • Repeat glossing on the bottom.

POLISHING

  • A bead has been formed on the rail where the deck and bottom gloss coats overlap. This is carefully removed and the board is then completely dry sanded by machine with a soft sanding pad using 400 then 600 grit sand paper. Then the rails are wet sanded.

  • Finally the board is polished, with first a coarse polishing compound and then an ultra fine compound.


STRENGTH

  • Fiberglass comes in many weights. Some of the common ones used in the surfboard industry are 4 oz., 6oz. 7.5 oz., and 10 oz. There is no realistic strength difference between Silane (the clear glass) and Volan (the greenish colored glass) finishes of the same weight.

  • Twist weave carries more resin than flat weave.

  • S-Glass has great memory, but this may be its undoing. It won’t stay bonded to the foam as well when severe denting occurs.

  • The amount of MEKP (methyl ethyl keytone peroxide also known as jeux de sims France) has an influence on the strength of polyester resin. The resin manufacturers recommend adding less than 2 percent catalyst. With such a minimal amount, the gel time would more than an hour, and the foam would absorb large amounts of resin making it extra heavy. In very cold weather, some surfboard glassers have been known to use up to 10% MEK to achieve the desired eight-minute gel time.


WEIGHT

  • The weight of two identically ordered surfboards can vary as a result of several variables.

    • Foam is mixed by weight for each particular blank. Since it is about the consistency of waffle batter, getting the same amount into the mold from the mixing bucket each time is difficult at best.

    • The stringer, being a natural wood product, can vary in weight due to what part of the tree it comes from. The amount of moisture it has will also affect the weight. Stringers glued in the summer will always have less moisture content.

    • The viscosity of the resin changes with the seasons. The resin used in the winter is always thicker.

    • Color in the lamination or a volan glass job requires extra resin to protect the cut lap. This extra resin can add weight, up to a pound.


COLORING

  • There are several ways to color a surfboard. These are listed in order of appearance in the industry.

    • Resin pigment. This is pigment added to resin and applied by brush after the board has been laminated, hot coated and sanded.

      • Due to the amount of pigment added to the resin, it becomes quite soft, and a clear coat must be applied over it. This makes a long board 2-4 pounds heavier. It is a very labor intense application and only a few glossers in the world are any good at it. With the extra layer of resin, this is the strongest and heaviest glass job.

    • Color in the lamination. When a board is fiberglassed, the fiberglass is pulled from the roll the entire width and length of the board. It cannot be sectioned, as this would cause a week joint. The only exception to this is when a colored panel of glass is placed inside of the bottom’s overlap line. When this is done, another layer of glass is applied over the entire deck to seal that joint.

    • During the fiberglass lamination process, pigment is added to the resin. It may be either transparent or opaque. The board must be taped off where the glass ends to form a clean, cut line. The lamination does not have to be volan glass, as silane with the color impregnated into the fiberglass and a razor cut line will produce the same look. Color in the lamination can only be applied on a complete side and rail wrap, or as an inlay that meets the rail wrap from the other side. Tail blocks and nose blocks are subsequently covered, so opaque laminations will cover the blocks and transparent laminations will cover them in that transparent color.

      • This and the resin pigment mentioned above are the most delamination resistant color processes. It is also labor intense, but not as much as Resin pigment.

      • The hot coat, which is the clear coating of resin that follows the lamination process, must be put on thicker with color in the lamination. This acts as a buffer, so the sander does not sand into the cut overlap. This extra thickness will cause the board to be heavier.

      • Because it takes a given volume of resin to laminate a surfboard, any foreign substance – and in this case pigment – displaces the resin. Pigment has no structural value so the strength of the lamination is diminished by the percentage of pigment added.

    • Pin lines. Ink lines and acrylic pins on the hot coat are applied after the hot coat is sanded. A single line of tape is placed down and an ink pen is dragged against it, using the edge of the tape as a straight edge.

      • Acrylic pins use two lines of tape and the acrylic paste is squeezed out of the tube between the tapes.

    • Foam spray. After the blank is shaped, the requested design is taped off and all other areas are covered with masking paper. Acrylic color is sprayed in the unmasked areas of foam. Pin lines can be applied using the foam spray method.

      • Paint does not bond to foam as well as resin. Observe the flap of glass on the next broken board you see, and note the paint on the flap, not the foam.

      • This is the most delamination prone of all color processes. However, it still is a most acceptable technique if the owner periodically checks the board for dents in an area that gets a lot of wear.

    • Acrylic spray. After the hot coat is sanded the surfboard is masked off to the desired design. Acrylic paint is sprayed onto the unmasked area.

      • Resin does not bond to acrylic paint as well as resin to resin. Large sprayed areas of acrylic paint may possibly delaminate. Acrylic paint on the rail is difficult and should be avoided because it is very easy to polish through. To avoid this, glass shops usually put on extra layers of resin. This adds weight.


SURFBOARD CARE


CURING

(Note: all degrees are Fahrenheit) Many things have been said about how long a board needs to cure before it is ridden. For the first 48 hours resin is very soft. Severe dents will occur wherever pressure is applied to the surface. Most boards are laminated one day, hot coated the next day, and sanded the following day. Severe denting is generally not a problem with glossed and polished boards. The gloss and polish process usually takes an additional several days, making about 5 to 6 days from the day it was laminated. The lamination process is the application that most needs to resist denting. If you wait an additional week after polishing the board will be reasonably cured. This time estimate is based on a typical 70-degree ambient temperature. If it is the dead of winter, and days and nights are very chilly, the waiting period can double or triple. Conversely, heat can greatly accelerate the curing process. Your board, exposed to about 115 degrees heat for several hours, will be adequately cured. Reliable sources tell me that this rapid cure actually increases the strength. Surfboards that are already cured cannot be made stronger by this process. Be very careful not to let the board get over 125 degrees. Polyester resin actually begins to soften at about 150 degrees. Foam begins to get unstable at 130 degrees.


DEFLECTION AND BREAKING

  1. Surfboards are a foam sandwich. The deflection rate of this sandwich is a mathematical formula. Thickness cubed delivers a relative number. For example: a 2″ thick board has a deflection rate of 8 while a 3″ thick board has a deflection rate of 27. The 3″ board is 1/3 thicker but more than three times stronger! The closer your feet are to the actual bottom surface, the more sensitivity and leverage you have. Thinner is better to surf on, but more subject to breaking.
  2. The surfaces of this bending foam sandwich are one side tensile and one side compression, much as a deck of cards. Most fiberglass that covers surfboards is split – 50% going lengthwise (warp) and 50% crosswise (weft). The fibers that cross the board do little to reduce deflection. Their main function is to reduce denting.
  3. The width of a stringer has the expected proportional effect; 1/4″ is twice as strong as 1/8″. However, increase the length by one-quarter and you double the deflection. Surfboards need to get thicker as they get longer.
  4. The combination of the stringer and fiberglass surfaces form an “I” beam. Increasing stringer size or fiberglass weight will decrease the breakage potential of the surfboard.
  5. Stress fractures are the hairline cracks that are the result of a surfboard going into an extremely stressful flex. The films of resin above and beneath the glass cloth are usually both cracked. This is a difficult repair job, as most of the cloth must be ground away but not removed. A batch of resin that has been diluted at least 50% is forced through the remaining cloth. When dry, several layers of very light cloth are applied over the damaged area making sure to cut the ends in a wedge. This disperses the load if the board again gets too much bend.
  6. Salt water weighs 64.3 lbs. per square foot. An unsupported section of surfboard will be at risk when exposed to the force of a wave.


DENTING

  • Dents are a natural Bi-product of surfboards. The old balsa boards, when whacked really hard, will dent. I have been in this business since 1959 and have seen no production foam boards with more than a total of 20oz of glass per side. When using contemporary polyester resins, the real problem in denting is the substrate or foam. Even with the early 60’s when foam weighed about 3.9 lbs. per cubic foot, surfboards still dented. Think of this: put one layer of 4oz glass on concrete and you will not dent it. To make a surfboard of reasonable weight, we cannot apply enough layers of glass to make it ridged enough to be dent resistant. Today’s longboard typically is made of foam that weighs somewhere between 2.5 and 3 lbs. per cubic foot.
  • Heat is probably not the cause of most deck delaminations. The main cause is that fiberglass just does not stretch. The shortest distance between two points is a straight line. A dent makes the distance between the edges of that dent greater. As the dent increases in depth so does the distance between the edges of that dent. Repetitive pounding in the dent causes slippage in the bond with the foam. This movement deteriorates that bond and accelerates the separation. The fiberglass, which has little or no elasticity, has no choice but to release from the foam. Deck dents delaminate primarily because of the constant pounding in one spot, and the lack of elasticity of the fiberglass. Failure to reinforce deep dents may result in delaminations.
  • To reinforce a dent:
    • Before the dent delaminates, remove the wax and sand the area thoroughly with 60 grit sandpaper, leaving absolutely no shine. Sand about 1 ½” onto the flats. Using a catalyzed batch of resin, apply 2 layers of 6 oz. glass to the dent. The key to this is to cut the glass so that it just overlaps onto the flats, making sure that the weave direction matches the same direction as the glass when the board was constructed. This technique will make the glass disappear. The object here is not to fill the dent, but to create more strength in the dented area, and to have a new layer of fiberglass that forces the old glass to hold the new shape. Hot coat all of the way to the edges of the sanded area. Do not use any masking tape. Free stroke your brush strokes, feathering at the edges and get out of it quick. Resin has a wonderful way of self leveling if you give it a chance. Sand the area when the resin has kicked off with 60 grit paper. Just blend the edges onto the flats so there is no lump. I finish the sanding with 120 grit paper, wax it and surf. Unless you are going to remove the wax when you eventually sell the board, the only person that will know that it hasn’t been glossed and polished is you. This is absolutely the simplest repair, and every surfboard owner should know how to do it.


DELAMINATIONS

  • The delamination of glass from foam can have several different causes:
    • Fiberglass does not stretch. The shortest distance between two points is a straight line. A dent makes the distance between the edges of that dent greater. As the dent increases in depth so does the distance between the edges of that dent. The repetitive pounding in the dent causes slippage in the bond with the foam. The fiberglass, which has little or no elasticity, has no choice but to release from the foam. Now there is an air pocket and the heat of the sun will cause this to swell.
    • Glass weight can contribute to denting. High performance boards typically have a lighter glassed deck than their cruiser counterparts. A lighter glass job and lighter foam is necessary to get the performance that performance driven surfers demand. High performance boards are going to be more prone to denting.
    • Foam weight can also be a source of denting. The less dense foam that is found in higher performance boards is more prone to denting.
    • Heat can cause a board to bubble. Fiberglass begins to soften at around 150 degrees. Its’ bond to the foam begins to deteriorate and is then subject to delamination.
    • Foam spray: Acrylic paint sprayed on foam does not have as good a bond as resin directly to the foam. The difference between the two applications is minimal, but if a laboratory were to conduct a test a clear board will win the bond contest. Color in the lamination cannot be as strong as a clear because the pigment has displaced some of the resin. Pigment has no strength so the amount of strength lost will be the percent of pigment added. However in laminations with color the hot coats are thicker, so there may be no measurable difference in the final product.
  • Some surfers just seem to be harder on their boards than others. If you are one of these, extra caution must be exercised, both at the time of your purchase, and after use.The real problem with delamination is the uneducated public. A customer purchasing a high performance board should not expect it to be as strong as a classic nose rider. Surfers should strip the wax from their boards – at the minimum – with every change of season, if only to keep up with the proper temperature of wax. During this cleaning, a thorough study of the condition of the dents is in order.


HEAT

  • Surfboards are very sensitive to heat. Most polyester resin begins to noticeably soften at only 150 degrees. Foam begins to become unstable at about 130 degrees. A dark colored board can reach these temperatures in just minutes. I have seen surfboards get amazing twists from improper storage or exposure to heat. More than one customer has brought back a fin that is severely warped. I have to inform him that the fin and surfboard have been exposed to excessive heat; usually in a car while it is resting on the fin. This fin is not ruined! Heat a large pot of water to 160 degrees. Using tongs, immerse it for about 30 seconds. Pull it out and using pot holders, bend it straight (it should be as soft as salt-water taffy). After it cools it is as good as new.A heat twisted board can be fixed with offset weights clamped outside the rail on the two high ends of the surfboard. I made a set of clamps from a pair of one by one pieces of wood about 24″ long with 4″ screws and wing nuts at each end. On a warm day, put the board inside of a car. Add the weights to the appropriate ends and clamp with the screws. Close the car and wait till it gets about 160 degrees inside. Take the board out with clamps and weights still in place. Put it on a set of level saw horses and lower the temperature with cool water. Check the twist. You may have to repeat this process or, if luck is with you, that is it.


DINGS

  • Fix any ding that exposes the foam to water. A ding on the rail will make the board susceptible to breaking. If it gets into a stressful situation, the stress will focus on the weakest point – the ding and may cause the board to break. Don’t let a split in the glass on the bottom go unchecked. I have seen the entire bottom glass ripped off because water was forced into a small split in the glass. Dents in the deck, which are commonplace with today’s surfboard construction, should have a couple of layers of glass put in the dent before it delaminates. Delaminated glass is far more expensive to repair than reinforcing the existing glass. Delaminated glass also exposes the board to breakage, as the foam sandwich construction has been compromised.All shatters will take in a minute amount of moisture. Large shatters may need some maintenance. While working with the clear silane glass, a really good repair person can virtually make a shatter disappear. Volan cloth will always show a little bit where the repair has been made.